
Proxy Video Editing (Bait-n-Switch) Method with Adobe Premiere
Posted on 6/24/2013 2:37:00 AM
(I did not invent this method but I have been editing this way since Premiere 4.2 with laptops. Just would like to share the experience.)
With today's high compression complex codecs like AVCHD or MPEG4 H.264, editing with NLE would be challenging on a lower power laptop CPU. The complex encoding scheme makes scrubbing on timeline less responsive. With Proxy files, editing could be done on low power laptops. It also makes possible with DSLR .MOV files doing Same Day Edit at weddings/events with a regular laptop too.
To have proxy editing, all source files are needed to be transcoded to a faster codec. These are my choices
AVI - Microsoft Video 1
MOV - Sorenson 3.0 or Photo JPEG codec.
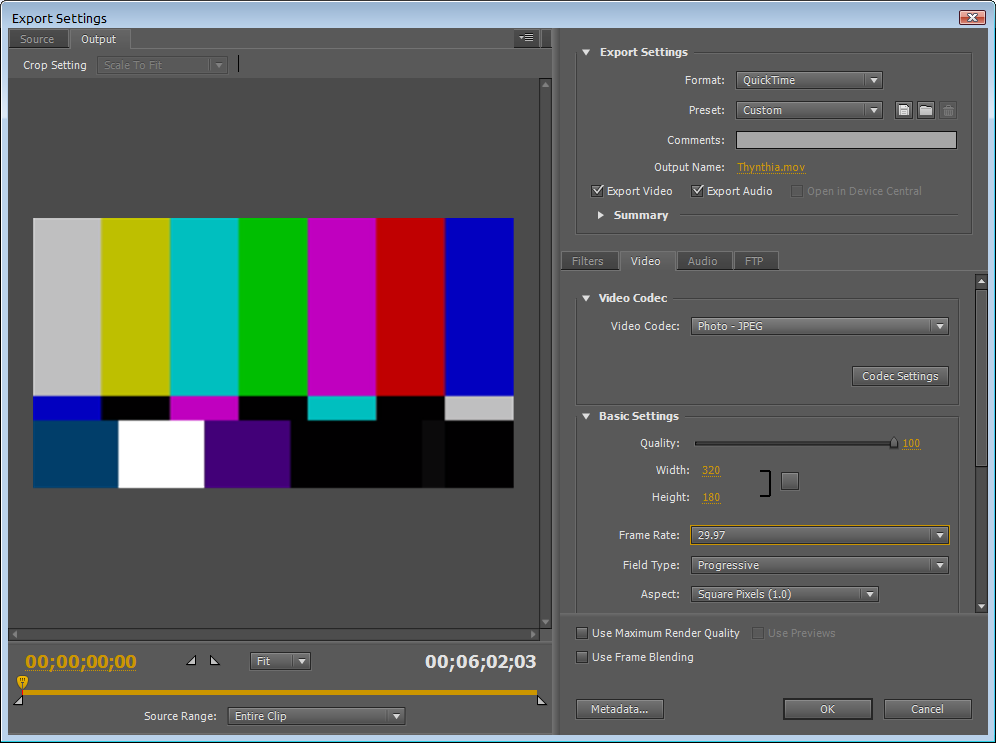
A tool allowing batch transcoding is needed. Grass Valley Procoder, or Adobe Media Encoder (AME) both allows Watch Folder setup. It's a quick way for automatic batch conversion. With AME, first we need to create an Export profile. For example, a Quicktime MOV preset can be set as follow
Video Codec : Photo - JPEG
Quality : between 50 to 100. Higher quality takes longer time to transcode.
Width and Height : 640x360 or 320x180. Higher resolution takes longer time to transcode. It could be as low as 256x144 for quicker conversion.
Frame Rate : 29.97 or 15 for 30p. 23.976 or 12 for 24p. It could be as low as 10fps for even faster conversion.
Aspect : Square pixel.
For audio codec, it should match the source clip format to avoid any re-conforming of audio in Premiere Pro. For most DSLR .MOV, it will be 48khz, stereo, 16bit.
Once done, save the preset to be used with the Watch Folder setup at Adobe Media Encoder later.
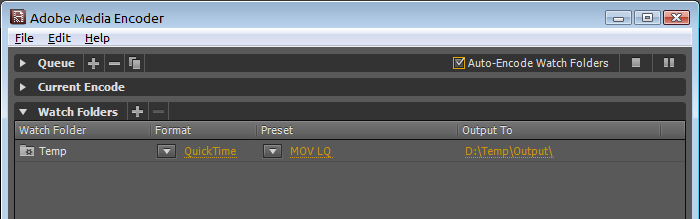
In AME CS5.5, you can create watch folder setup at File, Create Watch Folder. Then specify the Format as QuickTime, and Preset with the one created above. You might also check the option on top for "Auto-Encode Watch Folders". This option allows any files being copied to the watch folder to kick off the transcoding process automatically. It is great for working on Same Day Edit when content from memory cards are being copied to computer.
Once the low res MOV files are transcoded, they can be imported to Premiere for editing. The resolution together with frame rate could be low. But it is only temporary and good enough for a quick rough cut.
When done, before rendering a full quality version of the project (on the same laptop or at desktop computer), close the Premiere project. Then rename or move away those LQ MOV files. Next time when re-opening the Premiere project, Premiere will prompt the user to locate where are the missing .MOV files. At this time, point back to the original full resolution .MOV files. This "bait-n-switch" fools Premiere to export a high quality full resolution output.
I have been using Grass Valley Procoder's watch folder feature to transcode .mov files. The low res files are small and very portable. It makes editing with rough cuts a lot faster and more scrubbing responsive even with a low power laptop.
Any comments, welcome to leave them below.
 Comments
 Return to blog home page Subscribe Mailing List
Latest Activity
Comments on "ALL-I vs IPB"
"[b][/b] ..."
Posted by 3aplus63mineeon 4/19/2020Read More
Blog Archive
 2017
2017| Dec 15 | Facebook Group Photo Template (1) |
| Dec 1 | Great Harddrives Storage Case |
| Oct 20 | Cables Required to Record Sound Feed from DJ |
| Oct 12 | Should I Offer Wedding Video Raw Footage? |
| Oct 5 | Digital Delivery for Event Filmmaker at BVA |
| Sep 29 | Awesome RODE PinMic |
| Sep 15 |
Wedding Film Project Delivered using TakyBox vs Vimeo Pro 
|
| Sep 6 | No More Sandbags |
| Aug 28 | External Backup System with Harddrive Dock |
| Aug 8 | ALL-I vs IPB (2) |
| Jul 24 |
Sole Proprietor, DBA, LLC, S-Corp...
|
| Jul 17 | Cloud Storage vs Cloud Backup (1) |
| Jun 12 | Copyright Infringement Strike |
| Apr 18 | Audio Acquisition Comparison |
| Mar 16 | Color Tone Of Your Film |
| Jan 8 | Backup and Editing Workflow |
| Jan 2 |
TakyBox V3 Official Release
|
 2016201520142013201220112010200920082007