How to Edit DSLR Footage in Premiere Pro CS4

Posted on 8/8/2010 2:04:00 PM

If you are not ready to upgrade to CS5 but you need to edit your H.264 mov footage out of your DSLR with CS4, here's a free method to do so.

Adobe Premiere Pro CS5 provides native editing capability to popular DSLRs h.264 footage. With CS4, you will need to get plug-in like Cineform NeoScene ($99) to do the job. Here's a FREE workaround.
 
Without the native editing platform, a high quality HD codec to edit in AVI is needed. The fact is, Premiere is much happier to edit in AVI then in other format. Therefore, similar to Cineform, non-native clips need to be transcoded to AVI format with an intermediate codec. We can use the free Matrox I-Frame HD codec as the intermediate codec. We can also use Adobe Media Encoder to do the batch transcoding job.
 

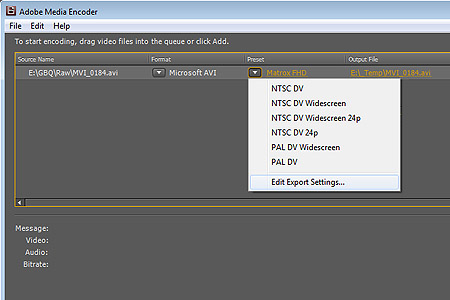
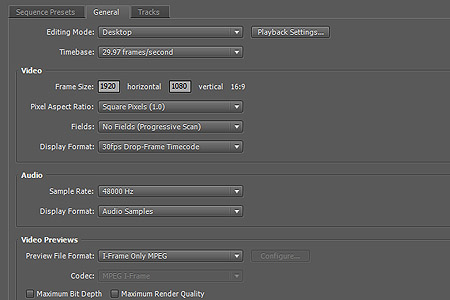
Download Matrox VFW Driver

Matrox used to lock their Matrox I-Frame HD codec to be used with their hardware products only. Recently, they unlocked the VFW codec. You can download it here.
 
Download Matrox VFW Software Codecs
 
After download, install the codec to your system.
 

Setup Adobe Media Encoder (AME) for Batch Transcoding

After installing the Matrox VFW codec, open up Adobe Media Encoder. Drag and drop any video file to it, then select "Microsoft AVI" under the "Format" column and select "Edit Export Settings" under the "Preset" column.


In the AME Export Settings dialog box,
 
   click on the "Video" tab
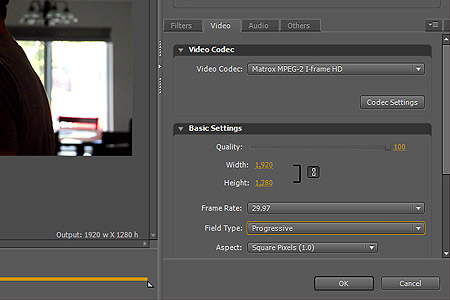
   select "Matrox MPEG-2 I-frame HD" under Video Codec
   Click on the button "Codec Settings"
   Assign a data rate. It ranges from 50mbps to 300mbps. Anything between 100mbps to 150mbps would be a good value to start.
   Select a frame rate that matches your clips
   Change Field Type to "Progressive"
   Change Aspect to "Square Pixel (1.0)"
   Now change the frame size width and height to 1920 and 1080.
   click on the "Audio" tab
   Make sure it is uncompressed, 48000 hz Sample Rate, Stereo, and 16 bit.


We are ready to go! Click on the "Disc" icon on top next to "Preset" to save this preset for future use.
 
Now drag and drop all the DSLR clips to Adobe Media Encoder for batch transcoding.
 

Setup Premiere Pro CS4 Timeline

Once all the clips are transcoded into AVI, import them to Premiere to edit.
 
   Start Premiere Pro CS4 and create a new project
   When creating New Sequence, click on the "General" tab
   Select "Desktop" under Editing Mode
   Change the Timebase based on your clip timebase
   Set frame size to 1920 and 1080
   Change Pixel Aspect Ratio to "Square Pixel (1.0)"
   Change Fields to "No Fields (Progressive Scan)"
   Under "Video Previews", select "Microsoft Video1" as the timeline codec.


Click on "Save Preset" for future use. The new preset can be found under the "Custom" folder in the "Sequence Presets" tab.
 
Now we can edit DSLR clips in Premiere Pro much easier. There will still be the red render line above the timeline. However, there would not be any lagging when scrubbing the timeline or stuttering during playback. If your computer is not fast enough, scale down the preview monitor, and force to "Draft Quality" mode.


Matrox I-Frame HD codec is a high quality intermediate codec to use. Best of all, it's free!


Comments

Posted by Randy on 8/9/2010 12:05:00 PM This is a great tutorial -- especially since it's free! Thanks for the information. The only thing I don't like about transcoding footage is the increased file size. But I'm still using hdv at 25mbps with its smaller file sizes. Although I hope to buy a t2i or 7d shortly, and this will be one of few free options to edit without buying Neoscene or CS5. Hope you'll be posting this on hv20.com

Replied by LA Color Pros Randy, glad you find the article informative. I actually posted this on hv20.com.
 
http://www.hv20.com/showthread.php?38249-How-to-Edit-DSLR-Footage-in-Premiere-Pro-CS4-without-NeoScene&highlight=neoscene+cs4+matrox
 
Actually, you can also perform Proxy Editing. That you transcode the files to a small size for easy editing. Once you are done, before export, switch all the transcoded file back to original source file. In that case, you can edit with ease, and export to the best quality (from the original source)
 
http://lacolorPros.com/blog/view.asp?id=9
Posted by Jakob on 9/25/2010 9:56:00 AM Really great guide!
Now im not stuck anymore when the trial version of Neoscene has expired. This does the job really well!
 
I tried MPEG Streamclip but didn't like it at all. Was too messy. This is easy and works very well. And when the preset is saved you don't really need to think about it anymore. Just batch and encode!
 
Thank you for a great tutorial!
 
/Jakob

Replied by LA Color Pros Jakob, glad you found the tutorial useful. With the popular of shooting video with DSLR, this info would be helpful to many of us. =)
Posted by Gavin on 10/14/2010 9:20:00 AM This is great and I was able to get Adobe Ppro2 to edit my 550d footage. Big thanks

Replied by LA Color Pros Glad that I can help. It's best to get CS5 so you can edit the footage natively. However, this is a good free solution if you don't have CS5 yet.
Posted by Aronn on 10/30/2010 8:44:00 AM First thanks for helping us out. Its nice to see that. Unfortunately, I'm still having problems. After following everything you said above, I'm still getting stuttering with playback and I have a yellow bar above my footage that I cant get to go away. When I export it, it is still stuttering a bit in the final product. When I view the footage after converting it in AME, it looks fine. Any ideas? I shoot using my T2i with a class 6 16gb Transcend SD card. Thanks!

Replied by LA Color Pros Aronn, the yellow line is normal as well as the stuttering within Premier is normal because you do not have Matrox hardware to support the codec to play back in real time full capacity. You need to change the preview mode to draft in Premiere and size down the preview window.
 
If you render out to a Matrox full HD AVI file, you will have stutter playback. This is an intermediate format. You need to export to your deliverable format..i.e. MPEG-2 for DVD, BluRay, H.264 for Bluray or YouTube output. or WMV, FLV... all depends on your application.
 
Remember, it is a free workaround method. So there is step to "work around".
Posted by Matthew Polack on 11/9/2010 5:52:00 AM Thank you so much for taking the time to write up this tutorial...I was about to buy Neoscene...but think I might hold off now. Your method works without the stutter (Cs4)...I was having troubles with MPEG stream clip.
I'ev compared the footage between Neoscene and your matrox method...very similar..Matrox slightly lighter...
Size wise:
Original MOV: 83.9Mb
Neoscene AVI: 101 mb
Matrox Codec AVI: 237Mb.
 
Any ideas why the Matrox is so much bigger than the Neoscene? Any way of bringing it down a little in size?
 
Anyway it works for free..which is great! Thank you so much.

Replied by LA Color Pros Mattew, glad this tutorial give some good use and save you money on purchasing NeoScene. The file size (of any kind of video) is determined by the data rate. So when you export video within Premiere, you can adjust the data rate for the Matrox codec. The lower the data rate, the smaller the file size, thus less in image quality. The higher the data rate, the biiger the file size, yielding higher and better image quality.
Posted by Dj on 11/16/2010 10:06:00 AM Hi All
 
When you convert from a DSLR mov to AVI, is there any loss of picture quailty, and does the conversion take a lot of time as well. By the way whats the difference between encoding the mov and transcoding,

Replied by LA Color Pros DJ,
 
There is generation loss of image quality on any form of transcoding or converting. Therefore, it is important to select a high quality intermediate codec or any lossless codec for this purpose.
 
Depends on the computer power you have, transcoding process thus takes up time.
 
You do not have to perform any transcoding if you computer and software is capable of editing the MOV file from your DSLR. That's the reason for this blog entry as Premiere CS4 is not capable of editing H.264 MOV file natively. Transcoding them into AVI files will make the editing faster and easier with your current computer with CS4. Adobe CS5 can handle those MOV files natively. Thus, there is no need to transcode if you are using CS5.
Posted by Jan on 12/11/2010 9:00:00 AM Hi, I tried to download and instal the Matrox codeck but it does not come out as an option in Adobe media encoder and niether in premiere (using cs4) any help?
thanks Jan

Replied by LA Color Pros Jan, you can find the Matrox codec under Microsoft AVI file option. As specified in this blog page, you won't be specifying it within Premiere, but select Desktop mode. Then in Adobe Media Encoder, select Microsoft AVI and choose the Matrox codec from there.
Posted by Neil on 1/11/2011 10:58:00 PM Hi, sorry for my bad English. What is the approx bit-rate that will match the image quality from the H.264 file? I want to edit my files that matches the quality from Native file H.264 to AVI. Thanks :)

Replied by LA Color Pros Neil, I set it to about 50mbps. You should try different values to see which one you like.
Posted by Randy on 1/17/2011 3:06:00 PM I finally bought a t2i and moving away from my hv30. Anyway, I recalled this post here and on hv20.com about converting the files. I'm using Premiere Pro CS3 and it doesn't come with AME as a standalone application. I tried converting using mpeg streamclip and the Avid DNxHD codec but noticed (as others) that it compresses the dynamic range which you can clearly see in the waveform monitor. From comments about the Matrox codec it keeps the same dynamic range. Do you know hoe I can do this transcoding with AME? The Marox codec is not available in MPEG Streamclip -- or I can't find it.

Replied by LA Color Pros Randy, I have never tried it with CS3. The Codec will function the same way. Now the only problem is you need a way to batch convert T2i MOV file to AVI with Matrox codec. Have you tried VirtualDub (I'm not sure if it can read .mov).
 
Otherwise, seems like paying for Cineform NeoScene will be a good option for you.
Posted by Randy on 1/17/2011 3:35:00 PM Thanks. I've been working on this issue since I posted this and it appears I've fixed the problem with the Avid DNxHD codec. All the instructions say to select RGB levels, as the Canons record with RGB levels. However, if you select broadcast REC709 levels, everything converts fine without crushing the dynamic range. I'm looking on my waveform monitor right now.
Posted by Kevin on 1/28/2011 1:11:00 PM Hey, this is great my stuff is playing back in the preview window- slightly jumpy but it wont allow me to put stuff on the timeline, infact there is no timelime !

anyway around this.

Is it to do with how I set the sequence- avchd 1080p

Replied by LA Color Pros Do not create an AVCHD timeline since all your source footage is now being converted to AVI. Follow the steps to create sequence that can handle the AVI files.
Posted by Kevin on 1/29/2011 2:21:00 PM So what sequence setting would take my newly converted files then for example.
I've tried different ones but I get a yellow line above the footage, and when i render it it just turns green.

Replied by LA Color Pros Yellow line is normal. It's for preview purpose.
Posted by Kevin on 1/31/2011 2:13:00 PM Sorry to be asking so many questions, but i have done all this and after import to cs4 my footage is showing up as a pink square with sound in the background.

any Idea whats causing this
Posted by Nick on 2/1/2011 7:38:00 AM Hi this is really useful for the codec layman, thanks a lot for posting.
 
For some reason my AME won't allow me to import the 7d .mov H264 files - any ideas why this might be?
 
What's the next best option for file conversion with minimum quality loss?
 
Thanks again!

Replied by LA Color Pros Have you installed the latest Quicktime to your system?
Posted by Nick on 2/1/2011 2:18:00 PM Hi, yeah i installed Quicktime last night and wasn't having any joy. But when i've opened up again today fies will import into both AME and APP CS4 fine. Must have needed the reboot to sort itself out.
And can already notice the difference in the transcoding matrox file to the 264 original in previewing a single clip.
 
Need to play around some more but on the way!
 
Thanks again!
Posted by scotti on 2/3/2011 9:56:00 AM Hi there, thanks for this excellent tutorial, everything works fine ! I still have a question though - previously I could load my (Nikon D7000) HD mov files directly into CS4 and edit them without this codec. Am I missing something here .. ? Why do I need to do this ?

Replied by LA Color Pros If Premiere can edit your mov file without problem, you do not need to use this method. Canon DSLR (5D, 7D, 60D, T2i) all creates mov files wrapper with H.264 codec. Adobe Premiere Pro CS5 can edit them natively but not CS4. Therefore, you can use this method if you are using CS4 with those H.264 mov files.
Posted by M. Myrdal on 2/3/2011 12:32:00 PM Thanks before,
Can it implemented in other resolution (such as 720p)?
And how about PAL system?

Replied by LA Color Pros As far as I know, Matrox VFW codec supports 720p as well as PAL system. I myself have never tried that. However, it should work.
Posted by David on 2/8/2011 1:56:00 PM To make it smaller, just make the Mb/s 50 instead of the recommended 100-150.
DSLRs only shoot 45Mb/s anyways

Replied by LA Color Pros You can configure a data rate that works great with you. Your suggestion would be helpful to other users.
Posted by Sam on 2/22/2011 10:31:00 PM I'm having a slight problem after going through the transcoding and setting up a new timeline. When I bring I transcoded footage into the timeline it is still playing back with a stutter, even after I change the quality and reduce the preview monitor.
 
Also, if I 'render entire sequence' the footage place back with no stuttter, but for some reason the aspect ration completely compresses and the footage takes up only the bottom 1/3 of the screen.
 
I don't really understand what this problem is and any help would be great.
 
Thanks!

Replied by LA Color Pros The timeline preview is mostly your CPU power. Not sure what kind of system you have, have you tried turned off Aero and other background services?
 
What format you are rendering the video into?
Posted by Sam on 2/22/2011 11:21:00 PM How would I go about turning off Aero? (sorry I don't really know what that is. I'm running CS4 on an XPS1530 laptop w/ T8300 @2.4 GHz and 3GB RAM.)
 
Also, how do I check what format I'm rendering it into? Every time I render the sequence (after making color corrections, adding effects, etc) that is when the aspect ratio is freaking out.
 
Thanks so much!

Replied by LA Color Pros There're many information on the web on turning off Aero effect on your computer. If you are using a laptop, turning Aero off also save your battery life.
 
You need to know what's your target audience before you render your video out. Are you rendering for DVD, BluRay, Web Delivery? Mobile Device? There're different format for each target audience. So you must have select the wrong type when you export your video.
Posted by Raymond H. on 3/26/2011 1:34:00 PM Great article! I'm glad that I found it in time for my new project that I am working on. The only thing I was wondering is if there is a way to make sure that the audio is correct with the mouths of the actors. When I converted, I noticed the audio didn't line up exactly, about 1ms off. I recorded my footage in 23.976 fps, but noticed that it rounded to 23.98fps in Maxtrons settings. Is this what is keeping the audio from being completely synced? Or did I do something wrong?
 
When I transcoded using Cineform, the audio was right on, but I don't want to pop $129 for Cineform just yet. Thanks in advance for the help.

Replied by LA Color Pros You cannot judge the lips sync through the timeline preview. Try to export a segment to see if the sync is off or not. I do not have such issue with my projects. The frame rate round off shouldn't be of any concern at all.
Posted by hiri on 3/27/2011 1:48:00 AM hi, love your article
but i don't understand..
i have the premiere pro cs4.0 on my computer
without any codec addition.. BUT i still CAN open, edit and export the file (mov from dslr). can you explain to me?. thx u
 

Replied by LA Color Pros You have Quicktime installed on your system that you can open those .MOV files. Just like you can double click to view them in Winddows Media Player. However, to edit them in Premiere, the performance is sluggish. It was because Premiere CS4 does not natively support H.264 codec in Quicktime MOV file wrapper.
 
If you are happy with the performance, you can skip this blog article and find something else in your life to worry about =)
Posted by Jon on 4/22/2011 6:37:00 PM Hi, I followed all the instructions but when I import the avi file into premiere CS4 I get a pink square instead of the actual picture. What could be the problem?
Posted by Anthony on 4/29/2011 12:43:00 PM I just saw your site. I bought Canon T2i recently and I suddenly came across the compression issue.
Please give me the tutorial on how to convert or transcode Canon T2i footage to make for an easy edit in my Premiere Pro.
Thanks very much.
Posted by James on 5/5/2011 4:35:00 AM Well done on these instructions, very straight forward.
 
Having a slight problem. when I put footage in the time line the yellow line is above it and it plays fine in the viewer. Once rendered and it has the green line above it, the image goes all squashed, very strange.
 
Was considering re-installing Premiere pro.
 
Any advice?
 
Cheers
Posted by kingsmate on 5/7/2011 6:07:00 AM Hello all, some should help me here! i did everything the way it is explained here but to my surprise the video doesn't display anything on premiere cs4 and on window media player it brings out the sound. Please what should i do cos i need to work on some stuffs urgently. thanks in advance
Posted by Brennan Freed on 5/8/2011 2:13:00 AM Hey, thanks for the tutorial! I'm having some issues though. First, when I try and make a sequence in CS4, and follow all the directions, the mpeg codec doesn't come up as an option in the preview files, but it comes up in media encoder. I am also getting the pink square problem as mentioned above. Help would be much appreciated! Thanks, Brennan

Replied by LA Color Pros Hi, I'm not sure what do you mean by the "Preview files". In Premiere timeline, there isn't an option for the Matrox MPEG-2 codec.
Posted by riko on 5/11/2011 12:10:00 AM hi.Ive got something problem the same as Brennan Freed.Under "video preview" cant fount codec "mpeg2 I frames" thus can't select "I-frames only Mpeg" as preview file format.Analysing thats why the video cant playback smoothly in previews.Any suggest?

Replied by LA Color Pros It is normal the video can't be playback all smooth in preview. you will have to make the preview window smaller, then change the settings to Draft mode if your computer can't handle full frame preview.
Posted by riko on 5/12/2011 12:28:00 PM I've already change the preview's and quality both are 25percent and draft.within I-frame mpeg2,can't be playback well. Gladly after Ive changed the codec into microsoft video1, smoothly preview appears now.Thanks for the tutorial.Anyway have u try another method for editing dslr footage in PP CS4?How's the result?

Replied by LA Color Pros In Step 8 of the setup in Premiere CS4, it shows select either MPEG-2 I-Frame or Microsoft AVI. I guess there is a difference on certain computer.
 
There is another method called "Proxy Editing". Basically use batch convert to generate a smaller version of the .MOV file for editing purpose. That will work on a laptop including netbook. I personally did it so I can edit rough draft with my 11" laptop sitting in a Starbucks.
 
You can read more here.
 
http://lacolorPros.com/blog/?10009-Proxy-Video-Editing---Bait-n-Switch-Video-Editing-Method
 
Otherwise, you can pay $100 to Cineform for the NeoScene product to edit DSLR footage in Premiere CS4.
Posted by Daniel on 5/20/2011 4:24:00 PM I was having a related problem. Hopefully this helps someone. Using Premiere Pro CS4, the MOV files from my Nikon D7000 would render previews that were squished to letterbox. Furthermore, they were scaled up (beyond the preview window) on playback. After reading this blog, I decided to try changing the Sequence>Sequence_Settings>Video_Preview to "I-Frame only..." and now it works great without needing to transcode anything! Thanks!
Posted by Mary on 6/7/2011 3:35:00 PM Will this workflow also work for .mts files being edited in PP CS4?
Thanks!

Replied by LA Color Pros You can try Adobe Media Encoder to see if it can convert the .mts to Matrox AVI.
Posted by Michael on 7/2/2011 7:49:00 PM Hello, I have the pink square issue as mentioned above, I followed your instructions exactly and all of my videos are a pink square.... Why is this?????
Posted by Jim Miesner on 7/8/2011 5:11:00 PM These import great on a windows comp, but when I try to import onto CS4 on my mac it says codec missing or unavailable. Any idea how to correct this?

Replied by LA Color Pros The Matrox codec is a Video for Windows (VFW) codec. It won't install in Mac.
Posted by Jim Miesner on 7/8/2011 5:14:00 PM NOOOOOOOOOOOO!!!!!!!!!!!!!!!!!!!!!
 
Any solution for us mac users? I am racking my brain. Don't want to have to get cineform.

Replied by LA Color Pros Sorry Mac people =)
Posted by Dan Schloss on 8/22/2011 1:35:00 AM Any thoughts for setting up a preset with these specs for Sorenson?
Posted by Neil on 9/2/2011 2:43:00 PM Hello, does matrox I-frame converts DSLR footage from 8bit to 10bit?
 
Posted by Maina on 9/7/2011 4:40:00 AM This was extremely helpful. I'm totally new to DSLR's as I'm used to editing content from regular Camcorders and I found this very helpful. Thanks a bunch for sharing.

Replied by LA Color Pros Glad we can help.
Posted by Simeon on 9/13/2011 12:14:00 AM I have the same problem as kevin, when I import the footage in PP and drag to the timeline, its shows a pink screen but audio works tho. I think the computer is not finding the newly installed codec, i restarted same thing? Thanks for taking the time to share your experience... btw am new to your blog greetings from Trinidad
Posted by Neil on 10/2/2011 6:56:00 AM
I'm using Premiere cs5 and some say that it will automatically upscale footage from 8-bit to 10-bit. Is this true?
 
Or is it better if I transcode the file into 10-bit using matrox then edit it to Premiere cs5? I want to color grade my footage by grading most of its information of the file.
Posted by Zach on 11/16/2011 3:01:00 PM will this work for a mac im having a really hard time editing in CS4 with dslr footage

Replied by LA Color Pros Unfortunately, this method is for PC only.
Posted by Yatta on 12/16/2011 9:11:00 PM I have Adobe Premiere CS4 and Cannon t3i but I have no problem bringing in the footage and editing. my problem comes from exporting. will this fix my choppy h.264 footage after export?

Replied by LA Color Pros Premiere CS4 doesn't support native H.264 MOV editing. That's great you can edit without any issue. However, it depends on which timeline preset that you pick that will have an impact on export.
Posted by Natanael on 1/30/2012 6:33:00 AM Hi
Thanks for great tutorial.
But I´m having problem on my computer at work. My avi files only have an bitrate of about 8000 kbps instead of 50000. I choosed 50 mbps. And I have tried this at home and it worked perfectly.

Replied by LA Color Pros Make sure you select Matrox HD MPEG-2 I-Frame codec only.
Posted by Tim on 2/1/2012 5:58:00 AM Hi, first of all thank you for your tutorial!
 
I've been working on a short film project for a year now but still had problems with export format and codec.
I shot it with EOS 5D Mark II and 550D in H.264 MOV. Whatever I choose, the exported file has less quality than the source, the contrast is downgraded and the blacks are more grey.
 
I tried to convert the native files into AVI as explained here, but once they're transcoded neither Windows Media Player nor VLC Player are able to show me a video picture anymore. I just hear the sound.
 
The same when I import them into Premiere CS4 and export it again.
 
I've already checked the settings and tried it as well with 130MB/s as with 200MB/s.
 
Do you have an idea?
 

Thank you very much for your help! I'm kinda desperate right now.
 

Tim
Posted by dhoam on 6/18/2012 11:29:00 PM Hi!!!
I just need to ask... after transcoding .mov to .avi and placed it in my timeline, there is no video appearing in the timeline just a pink color matte but with audio...
would you know what's wrong with it?
Posted by colin on 1/12/2013 1:11:00 AM I am getting pink screen as well
Posted by Moon on 2/12/2013 9:38:00 AM Tanks for posting such great tutorial, this worked for me, I was having trouble in editing dslr footage in premiere cs4 but thanks God for you guys who posted it. God Bless You All...

Replied by LA Color Pros Moon, that's great to know! Glad we can help.
Posted by james on 3/4/2013 8:30:00 AM Pink sqaure as well. Fix please!!!!!!
Posted by mikey on 3/12/2013 12:36:00 AM After editing in Adobe premiere with the HD dimensions can I export the material to PAL DV,lower field first and 25 frames from 30 frames?

Replied by LA Color Pros Of course you can do it but losing 5 frames per seconds will cause constant stuttering of the entire video.
Posted by DerLoody on 3/12/2013 9:01:00 PM best for you TlfFzXkd [URL=http://www.replica-gucci.webs.com/]gucci replica bags[/URL] online qQnxqVlj [URL=http://www.replica-gucci.webs.com/] http://www.replica-gucci.webs.com/ [/URL]
Posted by mikey on 3/17/2013 12:50:00 PM Am abit confused finished editing on the timeline using the 1280x720 clips from 500d canon.
while exporting to media to encoder what codec should I use?
my main issue after you told me I will lose 5frame per seconds is ,is there a PAL setting with 30 fps? the clips are in PAL but 30 fps.
or wat is the best setting to export the edited material to make a DVD and may be get avi file.
The clips have audio rate of 44100 can I make it 48000
please help.
Posted by Sue on 4/1/2013 4:51:00 PM No one seems to have answered the pink issue which is what I have. Did I miss something?
Posted by Elcid Asaei on 4/27/2013 10:04:00 AM LA Colour Online - you are a heaven sent buddy! Thanks for the great tutorial, and especially the preset guide! :-)
Posted by Luke on 9/26/2013 9:05:00 AM I installed the codec fine, but when I try to drop the files into AME, it still says they cant be imported...please explain to a newbie!
Return to blog home page       Subscribe Mailing List

Latest Activity

Comments on "ALL-I vs IPB"

"[b][/b] ..."

Posted by 3aplus63minee
on 4/19/2020
Read More

Blog Archive

 
2017
Dec 15    Facebook Group Photo Template (1)
Dec 1    Great Harddrives Storage Case 
Oct 20    Cables Required to Record Sound Feed from DJ 
Oct 12    Should I Offer Wedding Video Raw Footage? 
Oct 5    Digital Delivery for Event Filmmaker at BVA 
Sep 29    Awesome RODE PinMic  
Sep 15    Wedding Film Project Delivered using TakyBox vs Vimeo Pro  Feature Article
Sep 6    No More Sandbags 
Aug 28    External Backup System with Harddrive Dock 
Aug 8    ALL-I vs IPB (2)
Jul 24    Sole Proprietor, DBA, LLC, S-Corp...  Feature Article
Jul 17    Cloud Storage vs Cloud Backup (1)
Jun 12    Copyright Infringement Strike  
Apr 18    Audio Acquisition Comparison 
Mar 16    Color Tone Of Your Film 
Jan 8    Backup and Editing Workflow 
Jan 2    TakyBox V3 Official Release  Feature Article
 
2016
2015
2014
2013
2012
2011
2010
2009
2008
2007
 

Blog Home
Join Mailing List