
Adding Closed Captioning to Videos
Posted on 11/22/2011 5:21:00 PM
There're many tools out there to add closed captioning to video through NLE. Some closed captioning text "burn-in" method isn't an ideal sollution. The same text size might not be legible in both SD video and HD video. closed captioning should also support multiple languages/channels selectable by viewers.
Final video products can be distributed through DVD/BluRay authoring. Online video streaming is a popular way to distribute the final product. closed caption is a built-in feature for DVD and BluRay player. YouTube (but not vimeo) also support supports closed captioning. We also offer the Honeymoon slideshow hosted at our web site using Flash video linked to an external XML file. Here's the way we prepare video with closed captioning functionality.
Closed Caption Background Color
DVD/BluRay closed caption text has a black outline around. It makes it easier to read no matter the text is displayed on a light or dark background.YouTube Closed Captioning style is customizeable. It cannot display transparent background. Thus, white text on black background would be the default selection.
Because the difference in control of different player's CC output, we lay a gradient dark shade at the bottom of the video. In that case, the closed caption text would be easier to read. You can download this sample layer below.

Text Script
All these different platforms have different text script formats. Here's the 0three that we used (example below shows the first 3 entries).Encore
00;00;19;00 00;00;23;00 View from the short flight
00;00;24;00 00;00;28;00 Ferry ride from Tortola to Virgin Gorda
YouTube
00:00:14,00 --> 00:00:18,00
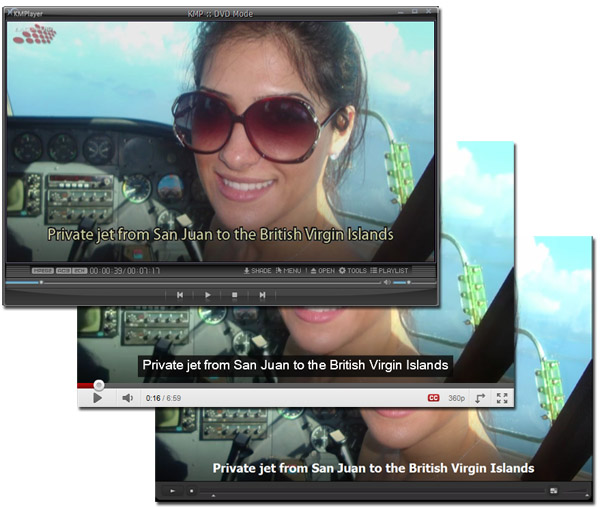
Private jet from San Juan to the British Virgin Islands
2
00:00:19,00 --> 00:00:23,00
View from the short flight
3
00:00:24,00 --> 00:00:28,00
Ferry ride from Tortola to Virgin Gorda
Flash Player XML File
< p begin="00:00:14.00" dur="00:00:04.00" style="1" >
Private jet from San Juan to the British Virgin Islands
< /p >
< p begin="00:00:19.00" dur="00:00:04.00" style="1" >
View from the short flight
< /p >
< p begin="00:00:24.00" dur="00:00:04.00" style="1" >
Ferry ride from Tortola to Virgin Gorda
< /p >
One Input Export Three
All the above 3 formats uses different timecode styles to control the timing and duration of the CC text display. We use an Excel spreadsheet to format the timecode to the style it is required. In that case, we only need to enter the timecode and closed caption text once, then select certain columns from the Excel sheet to save to each text script file (.txt format).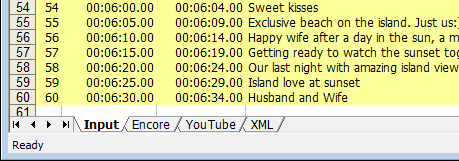
Encore Import Text Script
Once you prepared the text script file output from the Excel sheet into a single .txt file, you can import the text script in Encore. Right at the time line underneath the video track, right click on Subtitle 1: and select Import Subtitles, Text Script.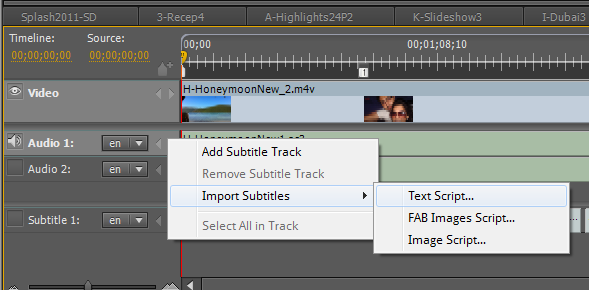
You will also need to turn on closed captioning for that video track in Encore if you want the closed captioning to be displayed automatically. Otherwise, viewer has to use their remote control to turn CC on.
YouTube Upload
For YouTube, after uploading the video, select "Edit captions/Subtitles" on top of the video display. Then click on the button "Add New Captions or Transcript". Select your text script exported from the Excel sheet then Upload.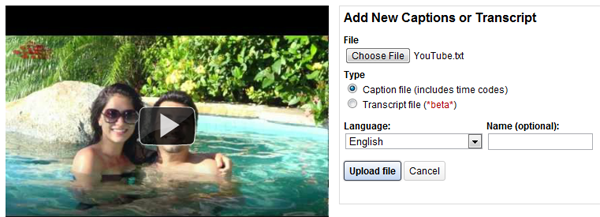
Flash Video Player XML Linking
There is no standard procedure for the Flash Video Player XML Linking. It is depends on how your Flash Player is written and designed. However, this is a typical XML Script you can reference to,< tt xml:lang="en" xmlns="http://www.w3.org/2006/04/ttaf1" xmlns:tts="http://www.w3.org/2006/04/ttaf1#styling" >
< head >
< styling >
< style id="1"
tts:fontFamily="tahoma"
tts:color="white"
tts:fontWeight="bold"
tts:fontSize="24"
tts:backgroundColor="transparent"
tts:textOutline="black 3px 3px"
tts:textAlign="center"/>
< /styling >
< /head >
< body >
< div xml:lang="en" >
< p begin="00:00:14.00" dur="00:00:04.00" style="1" >Private jet from San Juan to the British Virgin Islands< /p >
...
< /div >
< /body >
< /tt >
View the Results
You can view the resulting videos here YouTube with CC Flash Video at lacolor.com
Download
Free to download the overlay file and all text scripts below. Download closed Captioning Files
This is a high level overview on how we achieve closed captioning in our video projects. You can download all the files we referenced here. If you have more questions, feel free to leave comments below. We will try to answer your question.
 Comments
 Return to blog home page Subscribe Mailing List
Latest Activity
Comments on "ALL-I vs IPB"
"[b][/b] ..."
Posted by 3aplus63mineeon 4/19/2020Read More
Blog Archive
 2017
2017| Dec 15 | Facebook Group Photo Template (1) |
| Dec 1 | Great Harddrives Storage Case |
| Oct 20 | Cables Required to Record Sound Feed from DJ |
| Oct 12 | Should I Offer Wedding Video Raw Footage? |
| Oct 5 | Digital Delivery for Event Filmmaker at BVA |
| Sep 29 | Awesome RODE PinMic |
| Sep 15 |
Wedding Film Project Delivered using TakyBox vs Vimeo Pro 
|
| Sep 6 | No More Sandbags |
| Aug 28 | External Backup System with Harddrive Dock |
| Aug 8 | ALL-I vs IPB (2) |
| Jul 24 |
Sole Proprietor, DBA, LLC, S-Corp...
|
| Jul 17 | Cloud Storage vs Cloud Backup (1) |
| Jun 12 | Copyright Infringement Strike |
| Apr 18 | Audio Acquisition Comparison |
| Mar 16 | Color Tone Of Your Film |
| Jan 8 | Backup and Editing Workflow |
| Jan 2 |
TakyBox V3 Official Release
|
 2016201520142013201220112010200920082007